Hi blog's / Dudes,
In our india whats the use of TRAI ??,
The give lots of our money goes into cell phone corporates.
Ex. In cuba cellphone 24X7 Free. Because of speech "freedom",
In Russia Internet through WiFi Free.
In India if u go to Urine Rs3, Toilet Rs10, Water Rs.25, Train Platform Ticket Rs.10, Tomorrow ???,
But Laptop, Cycle, educational, Sleep in platform,
Ex, BSNL Give the plan Rs.3500, But same almost Airtel /others give as 4500 and more. How is it possible.
Because " we are fool ". We cant able to fight.
We are *****, ************, ******
Point 1, Why BSNL Customer care support very low ?
Point 2: Why others are give 24X7,
Please refer the attached file if u able to thing ?.
Better born as a indian, go to "die".

Apr 27, 2015
Apr 24, 2015
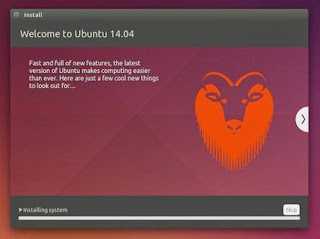
Install Ubuntu 14.04.2 LTS - Easy Free of cast to Install
Using a DVD ?
-
It's easy to install Ubuntu from a DVD. Here's what you need to do:
Put the Ubuntu DVD into the DVD-drive
Restart your computer. You should see a welcome screen prompting you to choose your language and giving you the option to install Ubuntu or try it from the DVD.
If you don't get this menu, read the booting from the DVD guide for more information.
Using a USB drive?
Most newer computers can boot from USB. You should see a welcome screen prompting you to choose your language and giving you the option to install Ubuntu or try it from the CD.
If your computer doesn't automatically do so, you might need to press the F12 key to bring up the boot menu, but be careful not to hold it down - that can cause an error message.
-
2. Prepare to install Ubuntu
-
We recommend you plug your computer into a power source
-
You should also make sure you have enough space on your computer to install Ubuntu
-
We advise you to select Download updates while installing and Install this third-party software now
-
You should also stay connected to the internet so you can get the latest updates while you install Ubuntu
-
If you're not connected to the internet, we'll help you set up wireless at the next step
-
-
3. Set up wireless
If you are not connected to the internet, you will be asked to select a wireless network, if available. We advise you to connect during the installation so we can ensure your machine is up to date. So, if you set up your wireless network at this point, it's worth then clicking the Back button to go back to the last screen (Preparing to install Ubuntu) and ticking the box marked 'Download updates while installing'.
-
-
4. Allocate drive space
Use the checkboxes to choose whether you'd like to Install Ubuntu alongside another operating system, delete your existing operating system and replace it with Ubuntu, or — if you're an advanced user — choose the 'Something else' option
-
5. Begin the installation
Depending on your previous selections, you can now verify that you have chosen the way in which you would like to install Ubuntu. The installation process will begin when you click the Install Now button.
Ubuntu needs about 4.5 GB to install, so add a few extra GB to allow for your files.
-
6 Select your location
If you are connected to the internet, this should be done automatically. Check your location is correct and click 'Forward' to proceed. If you're unsure of your time zone, type the name of the town you're in or click on the map and we'll help you find it.
TIP: If you're having problems connecting to the Internet, use the menu in the top-right-hand corner to select a network.
-
7. Select your preferred keyboard layout
Click on the language option you need. If you're not sure, click the 'Detect Keyboard Layout' button for help.
-
8 .Enter your login and password details
-
9. Learn more about Ubuntu while
the system installs…
…or make a cup of tea!
-
10. That's it. All that's left is to restart your computer and start enjoying Ubuntu!


Internet Connection Sharing (ICS) only Windows
Want to extend your computers WiFi Internet to another device via ethernet cable?
We have the solution! This works to connect up X-Box, PS3, and other devices like WiFi Radios.
Microsoft has a functionality called Internet Connection Sharing (ICS) that is made just for this purpose.
If the solution below does not answer your question then do some Googling on "ICS", there is a ton more info out there on this topic.
We will be using Windows 7, but earlier versions are similar.
Be sure your Windows 7 computer is already connected to the Internet via wireless before you start.
Internet Connection Sharing (ICS) only Windows |
Click the Windows icon and type "view network connections", then hit "Enter" on your keyboard.
Right-click on the icon that represents your wireless connection to the internet, then left-click on "Properties"
Go to the "Sharing" tab and check the top box, then choose
"Local Area Connection"

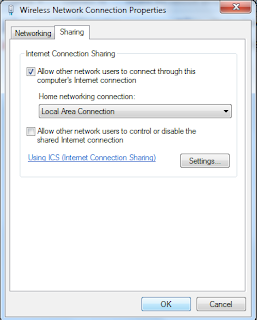
from the drop down below.
No need to check the second box. Just press "OK" at the bottom of the screen.

When everything is ready to go you will see the word "Shared" under your wireless connection to the Internet.
Its sharing with your computers Ethernet port (also called "Local Area Connection" on this screen).
Now you can connect an Ethernet cable to your computers
Ethernet port and share INTERNET to a second device.
Note: To return normal ethernet port functionality to your computer,
just repeat the above and unchecked the top box, then press "OK"
Expand your Wireless Network Range with an Old Router
What should you therefore do to ensure that the Wi-Fi signals are available in full strength in every corner of your house?
You can easily extend your Wi-Fi network with some additional hardware – like Wi-Fi repeaters and Wireless Access Points – but if you want to save a few bucks, just get hold of an old wireless router that you no longer use and connect it to your existing router using an inexpensive Ethernet cable.
Here's how I have setup the wireless network at my home using 2 routers connected with an Ethernet cable. I have is a main Wireless-N router connected to the ISP's modem. Then there's a second wireless router (Wireless-G) that is connected to the main router over an Ethernet or Cat-5 cable.
Use a Second Router as an Access Point
Let's call our main router MAIN (this is the router that is connected to the modem) and SlavE (the second router that you want to add to you existing network to increase your wireless range).
A: Note the Settings of the Main Router
Step 1: First we need to determine the IP address and the Subnet Mask of MAIN, our existing router.
Open the command prompt in Windows, run the command "ipconfig /all" and note the value of "Default Gateway." That your router's IP address. If you are on a Mac, open the Terminal window, type the command "route -n get default" and make a note of the gateway value.
For this example, let's assume your router's IP address is 192.168.30.1 and the Subnet Mask is 255.255.255.0.
Step 2: Open your web browser and type the router's IP address into the address bar. If you are using IE, you might want to add http:// to the address else IE may throw an error.
You'll now have to provide the user name and password for accessing the router settings. This will vary depending on your router's manufacturer – just Google for "<brand name> default router password" or try the standard combinations like admin/admin, admin/password and admin/<blank> (no password).
Step 3: Once you are inside the router settings, switch to Wireless Settings and make a note of the Wireless mode, the SSID and the channel.
If you have protected your Wi-Fi with a password, also note down the security mode used (WPA, WEP or WPA2) and your secret passphrase. Close the browser window.
B: Configure the Second Router
Step 4: Next we need to configure SlavE, our second router. First reset the router to factory defaults by hard-pressing the reset button for about 10 seconds.
Now connect the SlavE router to your computer using the Ethernet cable. Put one end of the cable in any of the LAN ports available on the router and the other end in your computer's Ethernet port. Make sure the router is powered on.
Step 5: Open the browser again and type 192.168.1.1 – the default internet IP address of your SlavE router. If you are not using a Linksys router, try 192.168.0.1 which is the default for Netgear and D-Link routers.
Once you are in the router settings, you need to change the values of the Wireless mode, the channel, the security mode and the passphrase such that they match with your MAIN router. You make use a different SSID name for this router.
Then go to Setup – > Advanced routing and change the current mode from Gateway to Router. Next disable DHCP Server since our main MAIN router will handle the task of assigning IP addresses to devices connecting to the wireless network.
Finally, change the IP address of the SlavE router to any free address in your LAN. For instance, if the IP address of MAIN router is 192.168.30.1, you can safely assign 192.168.30.2 to SlavE. Also make sure that the Subnet mask is the same as determined in Step 1. Save the router settings.
C: Connect the Two Routers with a Cat-5 Cable
Now that we have configured the routers, it's time to connect them with a physical Ethernet cable. Your main MAIN Router probably has five (1+4) ports – the WAN port (or the Internet port) should be connected to the ISP modems as before. Pick any of the available LAN ports on the router and connect it to any of the LAN ports on the SlavE router using an Ethernet cable. That's it.
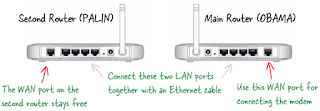
Now that everything is setup, you can connect your computer and mobile devices to the second router using either a wired connection (the three ports are still free) or over Wi-Fi. Since everything is part of the same home network, all your shared folders, music libraries, photos, and other files will be accessible from all computers and mobile devices that are connected to the network.